Wednesday, July 31, 2013

Vanilla Extract


Back in February, I made up some vanilla extract. I checked the bottles the other day. It smells more of vanilla than the alcohol, so it's going to be ready fairly soon. It's fairly easy to make. All you need is a clean, airtight bottle or jar (preferably glass), vanilla beans, and some sort of distilled liquor, like vodka or bourbon. Tools needed are a liquid measuring cup, labels, and a nice, sharp knife. I bought the beans online; they were on sale! Yay!

I went to the grocery and after much deliberation, I bought a 750 ml bottle of the cheapest vodka they had. I brought it home, slit my vanilla beans (lengthwise) and stuck a few (3 beans to 8 oz. of vodka) in some empty vanilla bottles I had sitting around in my cupboard because I just couldn't bear to throw them away. I filled the bottles with vodka, screwed the caps on really tight and stuck the bottles in the back of the pantry cupboard to steep.

A few days ago, I got another bottle of cheap vodka and made up more vanilla for some gifts. One of the people who got the vanilla mentioned that it would probably make a great cocktail just as it was. I was floored. I had no idea what to say. I'd never thought of using it as a cocktail. I don't even know if the stuff is drinkable.

I mean, I'm sure it's safe, because they sell it in the grocery store. It's not like it's moonshine, or chang'a or anything like that. It didn't have an acetone-y, mimeograph machine fluid, rubbing alcohol smell, either, so that's good (isn't it?). I guess. The label on the first bottle was in Cyrillic and it said "standard" (yes, I can read Russian...well, sound it out, anyway.). The second bottle label is in English and is made in the U.S. (in Vermont).

I buy vodka to use in pie crust and making up extract, so I look for the least expensive stuff in the largest amount possible. Judging by what I'd get if I were to buy chocolate, coffee, tea or cheese in the same way, this is probably NOT the best criteria for buying the best wine, beer, and liquor.

I had to totally psych myself up to do this. Those of you who either know my extended family, grew up like me, or are my extended family understand what I mean. The rest of you are all like "why???". I must have gone to the store on 7 or 8 different trips and chickened out of buying it before I actually did. There are very strong temperance roots on both sides of my family. (I see that blank look on your face. Frustrated sigh! Look it up. There's a Ken Burns documentary on the subject. Granted, it's from the opposite point of view, but that's only to be expected.)

So...I have NO idea if a glass jelly jar of barely steeped vanilla beans in vodka would make a good cocktail or not. Any comments on the merits of what constitutes a "better" vodka and if that makes a difference in the taste of the pie crust (or vanilla extract) would be appreciated. Attacks on my background, since it's not my doing, won't be (who needs that, right?).
Sunday, June 30, 2013

To Do List

You're reading this, so obviously, you're out of lives on Candy Crush and your FarmVille crops (versions 1 AND 2) are nowhere near ready to pick and your crafting energy and wells won't replenish for another three hours. You can't think of any more words for Words With Friends, either...not with the letters you were just dealt, anyway (x, k, q, and four t's with all vowels on the board taken). You really don't want to have to get off the internet or go to your site online or do whatever it is you ought to be doing, you're tired of the "You're Procrastinating" song, so you're spending time with me. I appreciate it. No, really. I really appreciate your time spent reading this.

If you're still with me, I have a lot of work to do. This is going to help me think through and figure out how to get it done. I got commissions for 4 pieces last week at church!!!!! Yaaaaaaaaaaaayyyyyy!! I'm happy, can't you tell? This means someone is going to PAY me MONEY to crochet!

She wants three scarves and a blue poncho just like the poncho I made for me at the height of the foofy useless scarf knitting/crocheting craze/revival some 8 or 10 years ago.
This is the blue poncho I crocheted for myself.

The color of the yarn I used for my poncho has been discontinued, but think I have enough to do the poncho, but not the scarves. I've started on the poncho to get that out of the way. It's going quite fast, I think.

Of course I'm not being interrupted by children crawling into my lap like cats do when you are crocheting, knitting, reading the paper, or working on the computer. My kids have gotten too big to do that. It still doesn't deter the youngest if she really wants attention, but it's also been hot for Torrance this week. While muggy weather doesn't seem to deter cats at all--it has the opposite effect, actually--it DOES tend to deter a young teen from mommy glomming.

In case you're wondering, NO, I don't have any cats. At all. My husband is allergic to them. I did have cats and dogs (and ducks, and chickens) when I was a kid. I lived in rural Ohio then. There was more space there.

So. Planning.
"I'm procrastinating/all day I sit there waiting/for the perfect moment to begin..."
Oh all right!

So. Set timer for an hour. Keep it in reach so I can turn it off when it beeps, get up and stretch my hands, go do something else, and then come back. If I do two or three hours, then I will see how many rows I can get done in that time...I might even finish it! Yay!

After that, I will need to alternately heat and ice my shoulder for 20 minutes, each. Then I will probably need to cook food for somebody, or go get groceries, and then cook food, or go take somebody someplace, or do SOMETHING, the nefarious purpose of which is to interfere with my crafting.

Fortunately, my middle child has a dentist's appointment tomorrow morning, so I will get some work done there!


Monday, June 3, 2013

Coogee Bay Dress Interweave Summer 2012 Update

Collar close-up

Soooo this is what I've done so far. Above is a close up of the collar. I got bored with continually adding motifs. I had one row on the other side. The problem was the sleeves are formed by doing the collar. I decided to crochet it to get a feel for how it will look when I'm done. The magazine instructions call for a spiraled crochet collar. I don't like to work round in spirals. I don't like the rows running into each other. I like a definite beginning and end to each row. So I crocheted the collar in rows in the round, and chained up at the end of each row. However, if you look at the center of the collar, this does make a visible join.

This is blurry. Sorry! This was originally designated as the "front" but since the collar has the chain up bit, I have decided that this will be the back. I still need to add more motifs to the bottom.
So this is the "new" front.
I've been adding motifs to the "new" front. I definitely will need to make a panel for the side and underarm. I'm having trouble holding the camera still when I take these photos. Sorry for the blur.

Tuesday, May 14, 2013

Spears 4 Warping the loom--Photos

This is the box the loom came in. My husband wanted to know what was meant by "reasonable length".


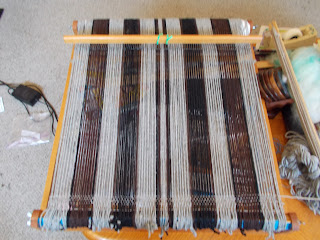
The loom is now all warped and ready for "Hands on History" day at the elementary school. Here are some photos of the process. Assembling the loom is not difficult. It's the actual warping where I have problems, mainly because it's tedious.
I forgot to take a photo before I started. This is with one section  of 16 threads put on. 
The reed/heddle has 168 dents--which is 10 dents per inch...it's about 17 inches long. As I said in the previous post about this loom, the warp is one from a project I had to cut off without finishing. The yarn itself is Paton's Classic Wool, in various colors.
The metal hook thing is a mini crochet hook which came in the box.  I use it to  sley the reed.  To Sley means to bring the yarn or thread through the reed and/or heddle. The thing with the wire loops is the heddle for this loom. The problem I'm currently having with trying to weave, here, is that the yarn that goes through the spaces gets stuck on the loops.
Here, I've poked the hook through the loop and grabbed the yarn with it.
Now, I'm pulling the yarn back through the loop.
The spaces on the reed are wide enough that I can just poke the yarn through.
This is from the back, tying the warp to the back beam. I used  the "butcher's knot" to tie on this end.
Here it is, all ready to go for the 4th-5th graders! 
On the cloth beam end, I secured the warp with an overhand knot and then put some blue painter's tape over the teeth, so the threads wouldn't come out when I advance the warp. On the other end, I used an old grocery circular (I think it was Vons) to cushion the threads so the layers don't stick together. This is something they don't tell you about in the instructions. When you weave, you need to put cardboard, smooth sticks, or an old sheet in between the layers of the threads and the cloth. In my case, it's last week's handy dandy grocery circular. Newspapers wouldn't work if you were working with a white warp because the ink would rub off on the threads.

I'm having a huge problem with this. The threads in the spaces want to hang up on the loops in the wire heddle. I'm not sure how to combat this. Battens? Or maybe misting the warp? I am NOT taking the warp off and sizing it with the solution of Elmer's glue!

I've ordered a new plastic heddle and it should get here by the end of this week or the beginning of next. They don't make this loom any more, so I ordered a 10 dent 16 inch Ashford heddle.

Duh! I just went back over and I tightened the warp. It doesn't stick, now. (Oh, darn, I've got another heddle coming...I'll just have to do a double heddle next time!)

Floor looms have a ratchet/gear thingy with a handle. This one, obviously, doesn't. To tighten the warp, I unscrewed the wing nuts on the back beam on both sides, and rolled the beam until the threads were extremely taut. You need to be able to feel/hear a "twang" on the thread, like it was a bent bow or guitar. 

Please note: you will not be able to launch arrows, play "Stairway to Heaven" or "Smoke on the Water" on your warp! That's NOT the purpose of the loom!

If you have a warp that is longer than the length of your loom, you will need to periodically roll the cloth up on the front one. To do this, you have to unscrew the wing nuts so you can roll both beams. You can't roll just the one, because if you do, you'll snap the threads. You'll also need to tighten the back beam from time to time, because the thread will stretch.

Even with the tightened warp, I have to slide the heddle up and down the length of the warp a couple of times to unstick the threads. Oh well, it will have to do for now. I think the 4th graders will enjoy it...or at the very least it will be an "educational" experience.

Wednesday, May 8, 2013

Warping the Spear's Size 4 Weaving Loom: First impressions and Planning.

I've been scouring the web, trying different word combinations, trying to find either a video tutorial or just a plain print one for this loom with not a lot of luck. A lot of people post photos of projects completed on this loom, and I've come across blogs that discuss getting one of the Spear's looms in a variety of sizes, but not one that discusses in detail how to go about warping the Size 4 with the rigid heddle.

First of all, I've misplaced my instruction manual. I read it when I first got the loom, of course, but I didn't find it very helpful. Someone posted pictures of the size 4 instruction booklet on Flicker, and I read the instructions again and found my original opinion to be correct. It was difficult to understand. I know why I'm having difficulties, but that doesn't help. The instructions fail to detail how to tie on the warp...at least, I'm having difficulty figuring them out.

I am in the process of warping the loom. I'm using warp from a project that I had abandoned and cut off a different loom. I didn't measure it...I think the strands are around 5 feet long. I don't really care how long it is. The purpose of this project is so to give the fourth graders at a local elementary the experience of weaving during a "pioneer living" day.

The loom itself was originally sold as a toy. The box says that it has a 16 inch weaving width. The front and back beams have "teeth". That is, there are grooves or slits cut into both beams. The beams are identical. They are also not smooth, which is a problem if you have a hairy yarn that snags.

A heddle is a warp lifting device. It lifts a group of threads at one time so you can weave more efficiently. Most simple rigid heddles will have a slot and hole construction. Think of a picket fence as the heddle. There are spaces in between each picket post. Those are the slots. Imagine each picket board with a knot hole in the center and you have the idea.

The wire heddle has twice as many spaces as the beams. This means that you have to put two threads in each of the "teeth" on the beams. One of the two goes through the wire loop and the other goes in the space in between. There will be 168 warp threads then, if you use the original heddle and if you use the teeth on the beams. Since I'm using Paton's Classic Wool, the beam teeth are full. If you had a thinner yarn or thread, it wouldn't be so bad.

So those are my impressions, so far. I will take photos to show what I'm doing and keep you posted.

If you want to ask questions, leave me an e-mail so I can get back with you. Thank you, Jackie and Angela for posting comments on previous blog entries!


Sunday, April 28, 2013

The Sweaters of "The Bletchley Circle"

I watch most of the shows I really like via their respective channel websites, because no one else in the family wants to watch them, just me. I do this in the afternoons after lunch mostly, while waiting for the kids to get home from school.

So...I'm watching the first episode of The Bletchley Circle on the computer. It's on P.B.S. I really like the show, so far...it's kind of like Nancy Drew meets Criminal Minds. However, I found myself getting totally distracted by the SWEATERS!!!!! Most of them look handmade, and handmade in an expert way, not in a haphazardly shoddy way.

I'm going to have to watch it AGAIN (if I can) just for the sweaters. I'm sure I've missed some. I found myself getting distracted from the story with thoughts like "Yes, the story is interesting, it's too bad that poor girl dies, and I wonder who the killer is, but never mind that, just LOOK at that SWEATER!", or "O.M.G.! There's ANOTHER one!"

First, I saw one or two in the code-breaking room and I thought, "Wow, what a beautiful sweater!" It was the beaded mohair/angora one the character Lucy was wearing. Then I saw the one that Susan was wearing (more ooh's and aah's).

Then, in an absolutely UNFAIR move, it's 9 years later and the scene opens with Susan knitting a sweater pattern in a really interesting hairy mustardy-grey colored wool. I just got a brief glimpse of the  name of the pattern and I remember it begins W-r-vowel-x---- Jumper. (Jumper is British English for sweater.) I NEED to see that pattern! I think the actress was just doing straight stockinette, though, not actually following the pattern, but I could be wrong.

More gorgeous sweaters ensue! Susan's wearing a maroon/burgundy/dark red cabled thing, I think. When the kids come home from school, the boy's wearing an argyle vest!!!!! Then she's wearing a blue one in a leaf pattern, and when she goes to visit her friend, the creepy guy who runs the coffee shop is wearing yet ANOTHER drop dead gorgeous sweater with cables and all sorts of beautiful fancy    knit stitches!!!!

I'll have to watch the other two episodes, just to see the sweaters. Total drool-fest!


Tuesday, April 23, 2013

Herbed Chicken Strips

I made something ALL my kids and my husband absolutely LOVE! I've made them twice, now.

Here's what I did:

I sliced boneless skinless chicken breasts lengthwise into three strips.

Then, I made a mixture of salt, pepper, rosemary, thyme, garlic, onion, and dill (about a tablespoon of the salt, and a teaspoon of the rest). The garlic and onion are powdered/granulated, not fresh and the other herbs are dried.

The first time I made this, I used my oven. The second time, I had my son grill them.

The first time, I sprinkled the mix on one side of the chicken in the pan and then put the pan in the oven at 350 degrees, until they were done. When something is in the oven, I go by smell. I think the oven took maybe half an hour.

The second time, I added two table spoons of water and two tablespoons of olive oil to the spices, poured it into a bag and put the chicken strips in the bag for about an hour or so, and then put them wet on the grill for about 5 minutes per side.

I think it would go better if I just put the chicken into the spices in a baggie without the water and oil.

We had some leftover tzatziki and coconut lentils and I made more rice and it was wonderful. (Two of the kids don't like the lentils, but I can live with that.

Next time, I'll take pictures and post them here.